Tuesday, January 31, 2012

Zinc Patina Cabinets!

Last week we posted about our Zinc Patina finish (see here) and mentioned that
we were working on some custom cabinets in both a bathroom and laundry
. . .well, they are finally done!


For a re-cap. . .remember the source of my inspiration?
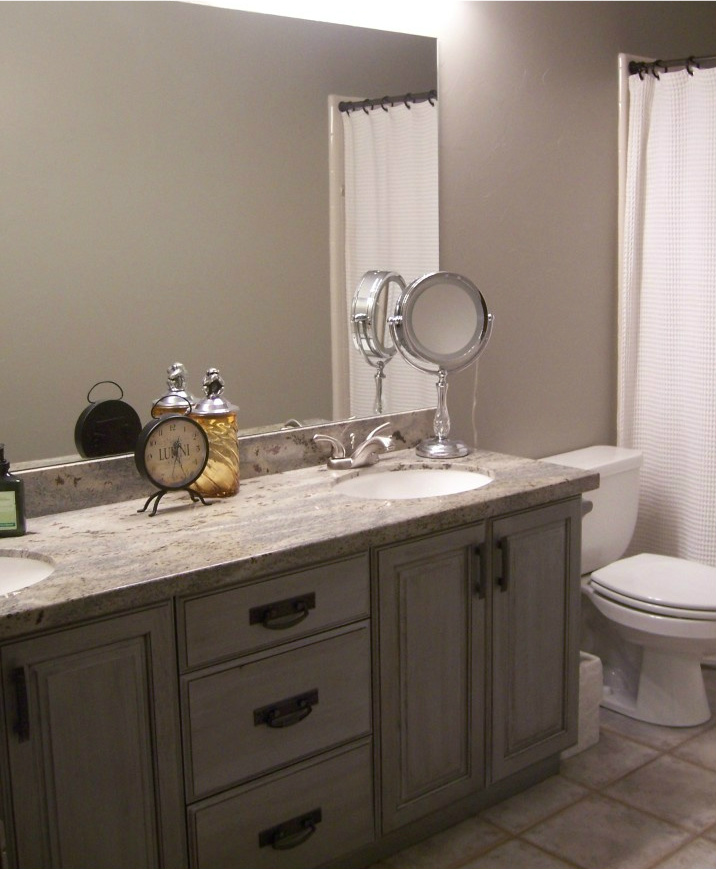

Yep, there she is. . .in all her glory! I LUUUVE Restoration Hardware!

Anyhoo, here's the picture of the bathroom cabinets before...


. . .and after


Here's the laundry room before. . .


Laundry room after. . .


It turned out sooooo purdy. . .the pictures just don't do it justice!

p.s. . .the Zinc Patina tutorial is under construction
and will be ready by Friday! (see here)


Linking up to:


Basic vs. Custom Tutorials

We've had a lot of wonderful compliments and questions on many
of our finishes. . .especially our Zinc Patina. . . Thank you!

As many of you know, we've been refinishing furniture and cabinetry
for several years now, and have spent a lot of time using the trial and error
method, while perfecting our skills and techniques. As we have experimented
throughout this time, we have stumbled across many new and unique ideas.
Because of this, we are able to offer a fresh perspective to our clientele.

With that being said, we have come up with two different ways to offer tutorials.


Our Basic Tutorials are free, and will consist of tried and true
techniques that are basic skills in painting and decorating ideas.
 
We hope that you will find them fun and inspirational!


Our Custom Tutorials will consist  of a "workshop" type
series, covering more complex techniques, but put in simple and easy
terms to understand. Originally we were tossing around the idea of
holding hands-on workshops, but felt that putting together step by step
 tutorials would be more beneficial for those who couldn't attend.
There is a small fee in ordering Custom Tutorials because
of the time and effort involved.

If you want to see our tips, tricks, and ideas, click here to view our tutorial page:)


Monday, January 30, 2012

Vintage Sideboard & Vanity

I just love vintage pieces that are rich with history!
They have a timeless look, and never seem to go out of style.

Here are a few pieces that we've finished in Pale Blue
with a walnut glaze overlay. . .


Here she is in her new home. . .


And this is what she looked like when she arrived at our shop. . .


Here's an adorable heirloom sideboard. . .


I love the detailed carvings in this one. . .very romantic!


 Former life. . .


It always amazes me what a little bit of paint can do!


"Be thankful for the least
gift,so shall thou be meant
to recieve greater"
                -Thomas A. Kempis


Wednesday, January 25, 2012

Zinc Patina

One of my
all time
absolute
fav-or-ite

places to "window" shop is Restoration Hardware (see here). . .

I always leave their website drooling...

One day, a few months ago as I was happily window shopping there,
I came across this exquisite line of furniture called Zinc.

Oh-my-goodness!

Is that not the coolest finish EVER?! 
Take a look at it in this bedroom. . . ahhhh me LIKEY!


Sooooo. . . I decided to give it try.
I figured I could always paint over it if it didn't work out!
By the way, my middle name is trial and error. . .
and I make alot of errors!

 I found a piece of furniture with straight and simple lines. . .
took a deep breath, and dove right in.

Here's how she turned out!


I've named it "Zinc Patina". . .in honor of Restoration Hardware.

We are currently working on a custom cabinet job in
the Zinc Patina finish. . .I'll be posting those next week!


"With every experience,
you alone are painting
your own canvas,
thought by thought,
choice by choice."
              -Oprah Winfrey

Monday, January 23, 2012

Random Weekday Giveaway!

Hey folks!

It's time for our Random Weekday Giveaway!


For the month of January, we will be giving away this

Adorable

vintage ceramic teapot


It's easy to enter the giveaway. . .here's how:

1. Leave me a comment. . . I LOVE making new friends!

2. Become a follower, and let me know in your comment

3. Share us on Facebook.

That's it!
At the end of the month, we'll announce the
winner and contact you via e-mail.
(*U.S. customers only)


"Good friends are good
for your health."
               -Irwin Sarason


Hardware refinish tutorial made simple!

Hardware can be expensive, not to mention that sometimes
drilling new holes is required as well!
This hardware was in great shape, but just needed  a little update.


Arrange all your hardware in a warm, well ventilated area. . .
and spread far enough apart to get all angles.


In this tutorial, we're going to spray the hardware in a brushed nickel. . .
but there are many other options to choose out of.
My favorite finishes to use are Valispar from Lowes, and
Rustoleum from The Home Depot.


The first thing you're going to do is prime the hardware. . .

Tip: When painting, use a white primer under lighter colors,
and gray or other dark primer for darker colors.


Let the primer dry for at least 30 minutes,
then put on a light coat of Metallic spray.

(sorry about the fuzzy picture)


Let dry for at least an hour, and then apply second coat.


Allow 24 hours dry time. . .and it's done!


Remember:
The paint will still be curing for the next
7-10 days, and can chip easily until fully cured!


And there you have it. . .sometimes the simple things
in life make all the difference!
 
 
If you want to see more tips, tricks, and ideas, click here to view all our other tutorials. :)


Sunday, January 22, 2012

Girl's Bedroom Makeover

The adorable little gal (Hailee) who lived in this bedroom was soooo excited to be
getting a makeover, and boy did this room need it! The nice thing is
that it was newer home, and didn't need any major remodeling done.


This darling little gal knew exactly what she liked. . .
purple and aqua. . .hmmm.
She also loved reading and butterflies! So, after getting the
green light from her mother, we set out to find
just the right stuff to bring her bedroom to life!

This is what the room originally looked like. . .


You can always count on Downeast Home to find just
the right things for a fantastic bargain!
This cute quilt and shams were perfect!


Here is another adorable set we found. . .had a hard time choosing
between the two, but Hailee knew exactly which one she wanted.

(Remember being young and knowing exactly how you liked things??
And as you grew, you listened more and more to the world,
and not your inner self?. . .Ya, that's me.)


So the decision on the bedding was settled thanks to Hailee. . .
now on to the paint choices!
After debating weather to paint the room purple or aqua,
we stumbled across this beautiful lavender shade. . .


See the legde under that window? We decided to make a little reading bench
by fitting a large plank for the seat, and bead board wrapped with trim,
. . .finished in crisp white.


 Custom farmouse shutters were built and finished in antique white
and distressed, with a light glaze to match the furniture.
Adding the shutters gave the room a cozy cottage feel. . .love it!


She was lucky enough to inherit her parent's bedroom
furniture, which we refinished in and antique white with
a light walnut glaze wash.


I love how the soft lavender contrasts against the glazed antique white!


We decorated with a few random accessories, leaving room for
Hailee to bring in her own personal touches...

I love a girl who knows what she wants!


...and she even got her butterflies.


Before...


. . .and after


(This and other room makeovers can be seen here )

"The authentic self is
the soul made visible."
                 -Sarah Ban Breathnach


Linking up to:
Skip to My Lou
Between Naps on the Porch
Embellishing Life
Vintage Wanna Be