Pages

Thursday, November 13, 2014

Old English Farmhouse Tables

I haven't had much time to blog lately because we've been over-the-top SWAMPED with work...
Not that it's a bad thing, just trying to keep up with it all has been a bit like spinning plates :)
Anyhoo, we finally took the leap to shipping our farm furniture nationally, and we've had a fantastic response. We're still trying to figure out a few of the minor details, but things are progressing well!

The newest item to our collection is an Old English farm table, with beautiful large 5" turned legs.
You know how I feel about pretty turned legs!

Well, this particular set is headed to New York at the end of the week, so I had to get a few shots of it before we shipped it out. Wishing I could just keep it!


This is our barn wood finish, which I'm reeeeally loving these days ;)
If you want to check out more of our farmhouse collection, click here!
Have a great weekend!!

Monday, October 6, 2014

New finishes to the farmhouse collection

We've added a couple of new finishes to our farmhouse collection that we are pretty fond of :)
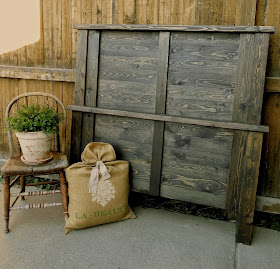
This is one of our head board/foot board sets finished in Charcoal Grey. 
This color resembles the patina of a primitive piece...love love LOVE this finish! 


 And this table top is finished in a new color called Jocobean, which is very rich and dark. 
I just love how the character in the grain comes to life once the stain is applied, 
and each piece of furniture has it's own unique look. 

We are also currently working on a kitchen island design, and toying with the idea of offering chunky turned legs as another option to our Provincial Farmhouse Tables. For more information, hop on over to the Farmhouse Collection! :)

Friday, August 15, 2014

New item for sale

It's been a while since we've finished any items to sell, but I've had this beautiful French Country queen sized headboard patiently waiting to get an overhaul. We decided to keep it simple in antique white, with a touch of distressing. It's also finished off in a satin lacquer finish for protection and durability. Available now for $200. 


Thursday, August 7, 2014

dressing up the shop

A couple of years ago, we outgrew our small workspace and decided to build a workshop that sits at the side of our backyard. For a long time it was a bit of an eyesore and pretty boring. I'd still like to paint it a different color, but we did build some shutters and a garden box to add some character. 
...pardon the plastic in the windows :)


While out shopping the other day I spied some fun metal decor at Hobby Lobby that would fit well, and get a nice rusty-patina over time...it's not a huge change, but definitely more homey :)


 Like I said, it's not much...but it's little details like this that make me a happy gal!


Tuesday, July 29, 2014

Early American Writing Desk

We've added a new item to our farmhouse collection :)

It's a replica of an early american writing desk, with aged wood and turned legs....
two of my most favorite things! 


This piece is finished in Strawflower w/walnut glaze, and Driftwood on the top.


Full details of this desk as well as the rest of our farmhouse collection can be seen here.

Thursday, July 17, 2014

DIY plank wall tutorial...cheap!

I've been wanting to plank my bedroom wall for years, and since we were installing the wood floors I talked my hubby into planking the wall as well...yay!! 
There's nothing like a good old white plank wall to bring in the farm house charm :)


This is what the wall looked like before...

Since this is a 20 ft. wall, I knew it would have been pricey to plank in real wood, so we opted for
 4' x 8' sheets of underlayment at $11.97 a piece...which means it only costed $50 :)


The nice guys at Home Depot cut wood for free, so I had them cut 6" strips along the 4' length
(although my hubby is a perfectionist and ended up re-cutting most of them)


Using a nail gun, we attached the 4' strips along the top, but since our ceiling wasn't flush we started about an inch lower, and then covered the upper area with a trim piece. Once we got to the end, we cut the strip to fit, and used the remaining piece to start the following row. That way, the planks are automatically staggered, and there's no waste :)


We separated each plank with a penny both vertically and horizontally to create an even gap.


Painting the planks are kind of a pain, but the most effective form I found was with a mini roller :)


If the paint sticks in between, make sure to use a toothpick to separate it while it's still wet! 


And that's it! Here's a before...

And after...lighter & brighter :)

(still needs baseboards!)


My cute son found this old bottle out digging one day, and I just wrapped it in thick jute, sealed with a dab of hot glue on the back. I love the pop of color and the texture from the jute against the white wall :)


Ahhh, crisp and clean...just the way I like it! :)

Underlayment: Home Depot
Plank color: Akamina- Kwal Howells
Wall color: Old Washer- Kwal Howells

Tuesday, July 1, 2014

Studio 5, Segment #2

We just wrapped up our second segment with Studio 5 last week...I have to say that our first go-around, we went a little overboard and had WAY to much stuff for display. Now that we've gotten our feet wet, this time went a little smoother and was much more low key and enjoyable.

Our focus was on how to pull together an organic summer garden party or wedding, using a lot of natural elements such as moss, rocks, burlap, tree stumps and branches, and dried gourds. We also added some tarts, with home grown berries and a veggie box. These items are inexpensive, and a great way to decorate for a rustic look :)


We repurposed these soda bottles by filling them with our favorite juice mixture, adding a cute printed sleeve, and soaking the top fabric in melted wax and forming over the tops of the bottles.  After tying it off with a thin jute, we dipped the bottle top in the hot wax one more time to seal it.
These can be washed and re-used over and over again!


A unique way to display veggies is to stand them up, and garnish with a some pretty green kale :)


This is a crummy phone shot, but here's Wendy and I...partners in crime! 

Next segment, we're getting whimsical! :)


Tuesday, June 3, 2014

fun studio 5 segment with Lumiere

A few months ago I was offered a position as design director for a fun new company called Lumiere Event Planning, and last week we kicked off the season with our first segment on Studio 5....wha-hoo!! 

We focused on tips & ideas for a vintage wedding or party:


It was pretty surreal seeing my vision come together.
It's one thing to have it all in my mind...its another to see it on display on the set.
Such a fun experience!


This dress was pure lace...so beautiful!


We put cute little succulents in the vintage tea cups, and the adorable mini apple pies and country cupcakes were made by our catering company, Sweet Pea Catering.


One of my favorite things to do is fill old mason jars with layered brown rice, great northern beans, and black eyed peas...and of course, I ALWAYS have to include some beautiful ironstone!


The tea cup & saucer sets, ironstone, old mason jars, vintage candy tin, and typewriter were all from the Sandy Antiques Mall...and pretty reasonably priced! I had a lot of fun in that store ;)


Using an old suitcase or crate/box (this one is from Hobby Lobby) it's easy to create a
fun space for guests to put cards at a wedding...


Thankfully, Wendy was the lucky one to be in front of the camera, while I was comfortably hanging out on the set taking pictures and enjoying seeing all this hard work come together :)


Studio 5 must have liked us, because they have asked us to put another segment together for June 25...yay! This next one will be sharing some of our Organic Garden Party Collection :)