
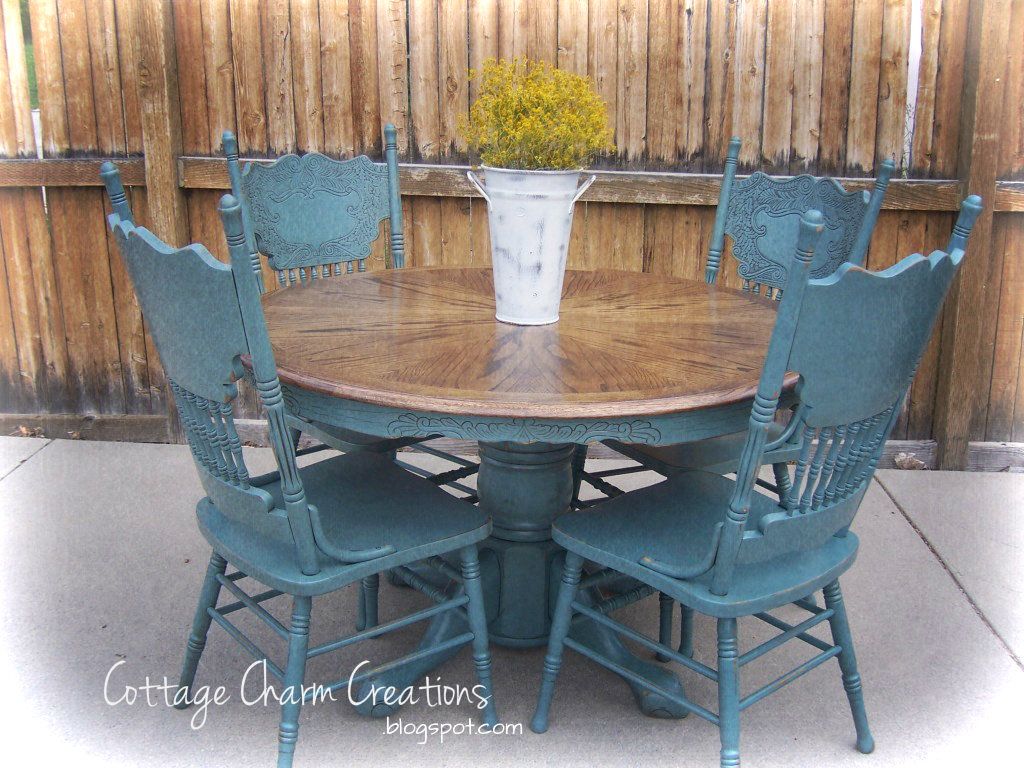
Hubby and I just finished this adorable country table for one of
our clients and we are thrilled with the way it turned out :)
When we got this, it was structurally in good shape, but had several
burn marks on both the table top and leaf. . .nothing that a good
electric sander can't take care of!


The chairs also had a great design. . .perfect for glazing :)

Our client wanted a deep turquoise with the top finished in dark walnut,
so we browsed through the color deck to find something that would
compliment the stain. . .

Using a 60 grit sand paper and our trusty orbital sander, we
were able to get down to the bare wood.
We also made sure to go back over it with a 100 grit to smooth it out.

One of our all time favorite finishes to use is Minwax Dark Walnut,
and can be purchased at Home Depot or Lowes.

Make sure the surface is dusted well, and brush on. . .

With a clean cotton cloth (we cut up old t-shirts) simply wipe off. . .easy as pie!

When staining, do an entire section at a time. . .

Allow to dry at least 24 hours.

For the clear coat, we use both of these products, and get great results:
1. Brush on clear coat. . .after completely dry, sand lightly (sanding sponge) and dust off.
2. Follow step #1 again. . .if it's still not completely smooth, repeat this
step a third time.
3. Using the aerosol can in sweeping motions, spray on clear coat.
(you may want to practice this procedure on an old piece of wood first)
. . .and this is what you get

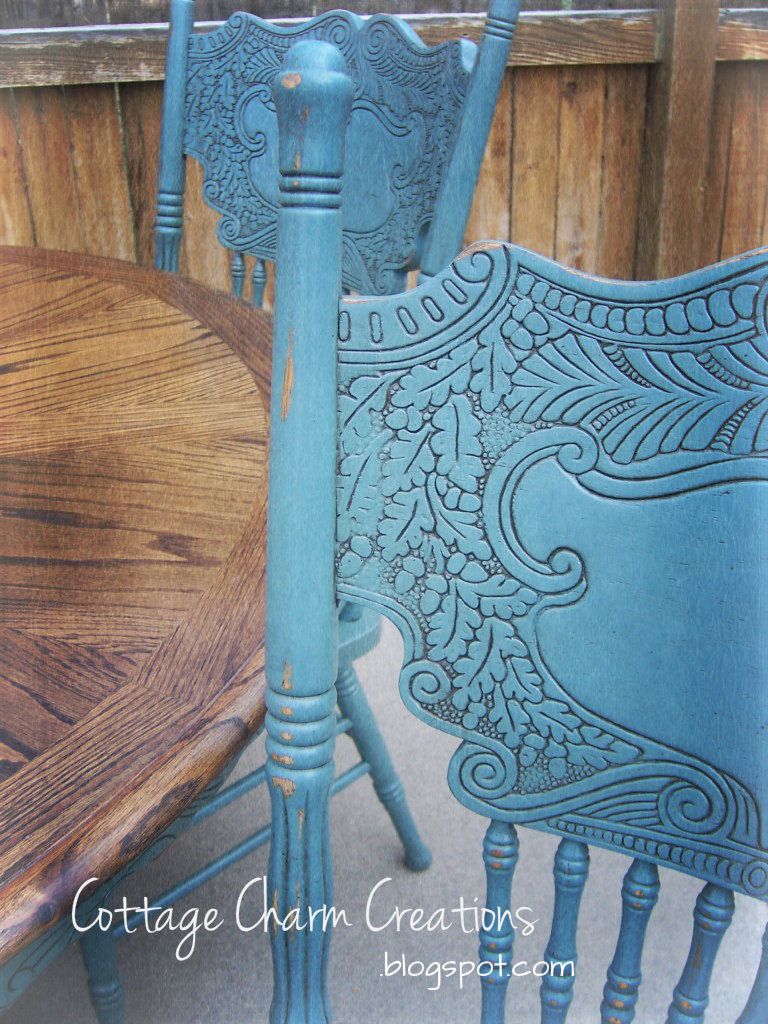
Here's one of the chairs before applying the glaze.
It's pretty just the way it is, but the glaze will deepen the color,
as well as bring it to life once it gets in the grooves. . .

Oooooh yes, that's what I wanted :)
Another shot of the table skirt before glazing. . .

A little distressing, a little glazing. . .
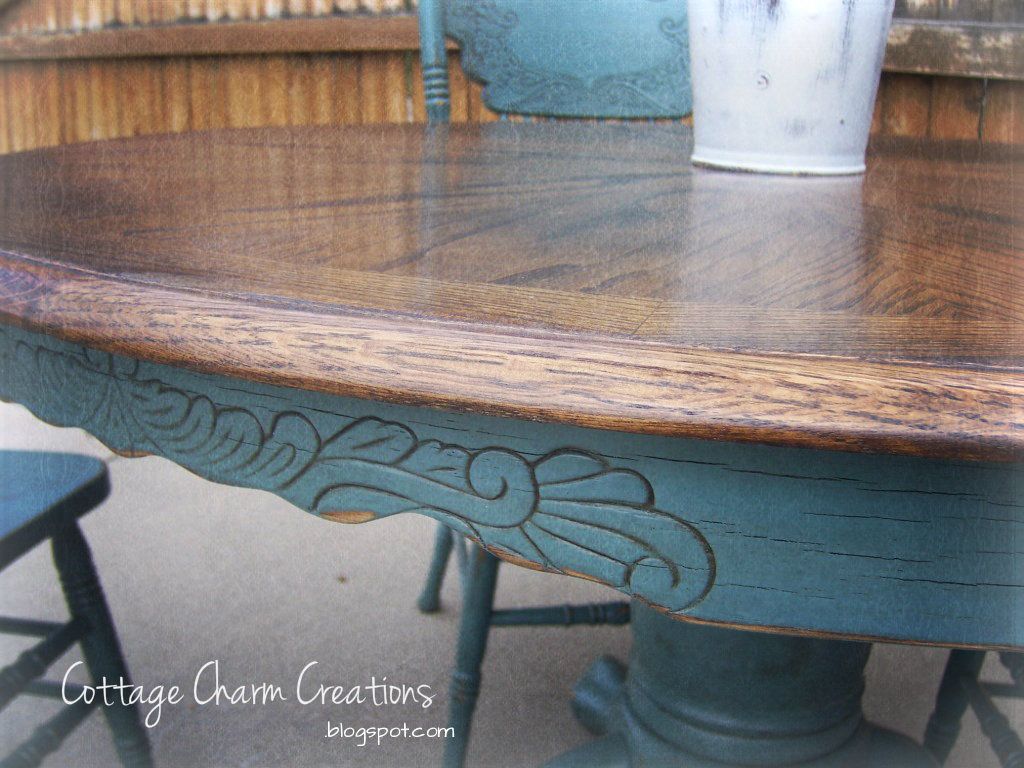
And there you have it. . .a beautifully stained, two-tone finish :)
Just like new. . .YUMMY!
You can learn more about our oil glazing tutorial here.
and...
Beautiful......i recently started to refinish a table just like this!,,,,love the colors you chose! Can't wait to finshed mine...would love to have you visit at pinecreekstyle.blogspot.com. NeeCee
ReplyDeleteSo pretty! I love the blue and the natural wood look together. Great Job ;)
ReplyDeleteIncredible! I'm speechless........
ReplyDeleteAMAZING JOB! Love the chairs!
ReplyDeleteThis is AWESOME!!! I'm definitely going to look around your blog more! Looks like my kind of place. ;)
ReplyDeletegorgeous. i love the two-tone look, and those are my very favorite kind of chairs, especially when painted in blues or greens or some funny color in between.
ReplyDeleteblessings,
ann
I am absolutely in love! We're buying our first house and th eone thing we won't have is a kitchen table so I've been scouring places looking for one to make our own =) Pinning this!
ReplyDeleteVisiting from Today's Creative Blog
I have a table I painted a couple of years ago in a hurry. Now it needs to be redone. This tut is perfectly timed! I would love it if you shared it on my linky party Tout It Tuesday http://www.claimingourspace.com/2012/06/tout-it-tuesday-9.html
ReplyDeleteit is beautiful Love the soft blue and so glad you left the table top natural. Thanks for joining TTT. Hugs, Marty
ReplyDeleteBeautiful! I would love if you shared more about the glaze. Unless I missed it, which product did you use? I've just used wood stain on top of my painted furniture, but I was curious if it was something special. Thanks!
ReplyDeleteYou certainly gave new life to the table and chairs. That table top looks gorgeous now. I would venture to say it looks better now than when it was new. ;)
ReplyDeleteThanks for linking to Time Travel Thursday. Be sure to stop in and see the announcement, this Thursday, of my latest giveaway.
Blessings,
Liz @ The Brambleberry Cottage
Loved the tutorial! You made it look extremely easy to replicate that look...My mom has the same exact table and now only if she'd let me refinish and paint on it when it starts looking a little worse for the wear! I was in need of a new table and started browsing craigslist and what to my wondering eyes should appear: http://daytona.craigslist.org/fuo/3039325821.html The same EXACT table!!! I'm thinking of getting it and even though the finish doesn't look bad, who needs a reason or an excuse to do a little DIY? It's listed at 200...but I'll polish off my bargaining/negotiating skills and see if I get it for less. A wise woman once told me (my grandmother)you never pay full price! Can't wait to try this out!!!
ReplyDeleteDid you sand down the chairs before painting them? I have that exact same set and that is what I want to do to them, I have the turquoise paint even! But I need to know what you did to the chairs before painting them. Thank you!
ReplyDelete