Friday, April 27, 2012

new shoppe items!

We have a couple of new items that are now available at our Shoppe :)


First up are our Grain Sack Pillow Covers. . .


This one is called "L'Art Culinaire," and comes with a
red ticking fabric, and jute tie.


Here is our "French Scallop" grain sack pillow cover, finished in
creamy white and lime, with a soft french linen tie. . .


Hand woven with jute. . .


All of our grain sack pillow covers fit a standard 20" x 20" pillow insert.


Also available is our green apple "Pantry" farmhouse sign. . .


Measures 24" x 7" and hangs by weatherd rope.
Thanks for visiting, and feel free to stop by our Shoppe anytime!

Monday, April 23, 2012

Farmer's Market at Gardner Village

We are sooooo excited to be a part of the 2012 Wasatch Front
Farmer's Market, at Gardner Village this year :)


This summer, come by to say "Hi". . .and spend a Saturday strolling around this
beautiful old mill and cobblestone paved walkways, lined with quaint little shops.


In addition to this adorable little village, will be the Farmer's Market.

 Local farmers and various artisans will be selling fresh produce and yummy home made
goodies, as well as unique one-of-a-kind crafts, decor, and treasures. . .all with that
old world charm and ambiance.

Here's a peek of what Gardner Village has to offer. . .

Village Quilt Shop at Gardner Village
Naborhood Bakery at Gardner Village
cottage retreat salon and spa at Gardner Village
Sweet Aftons at Gardner Village
Aunt Elsie's Trinkets at Gardner Village


The Farmer's Market starts June 2, and runs every Saturday through the
end of October. Open from 9 am-2pm.


We'll be posting plenty of pics when the Market begins. . .so come back and join in on the fun :)

We hope to see you there!!


Friday, April 20, 2012

farmhouse signs

Introducing the newest members of our
Farmhouse Signs...

There's nothing like a good old vintage sign to bring in that
small town, country charm to your home.
Each sign is custom designed and individually
hand painted, making it authentically unique :)

Our "Dairy" sign is finished in white, with a light patina overlay.


Measuring 23.5" x 14". . .and hangs by weathered rope.


This next one is our "Custom Name" sign, and is great for weddings
or business names. . . just provide the name and date established,
and we'll do the rest :)


Measures 23.5" x 7"and hangs by weathered rope as well.


To see more of our custom farmhouse signs, details,
 or vintage accessories, please visit our Shoppe here.


Thursday, April 12, 2012

Sewing table transformation

I'm quite fond of old sewing tables. . .and have never met one I didn't like :)

As I was strolling along at the goodwill yesterday, this sweet
little table kept calling my name.


She was pretty plain and worn out. . .and had been stripped of her
sewing machine and hardware, but she was solid and sturdy and
I knew it would be and easy fix. . .so she came home with me.


I decided to take a picture AFTER I had stripped the top, but
you get the idea. . .


She got a coat of Minwax "English Chesnut" on the top, and black distressing on the body. . .

. . .simple, but  sweet :)

She's now ready to be adopted into a loving home. . .
Any takers?

Tuesday, April 10, 2012

flags & flower pots!

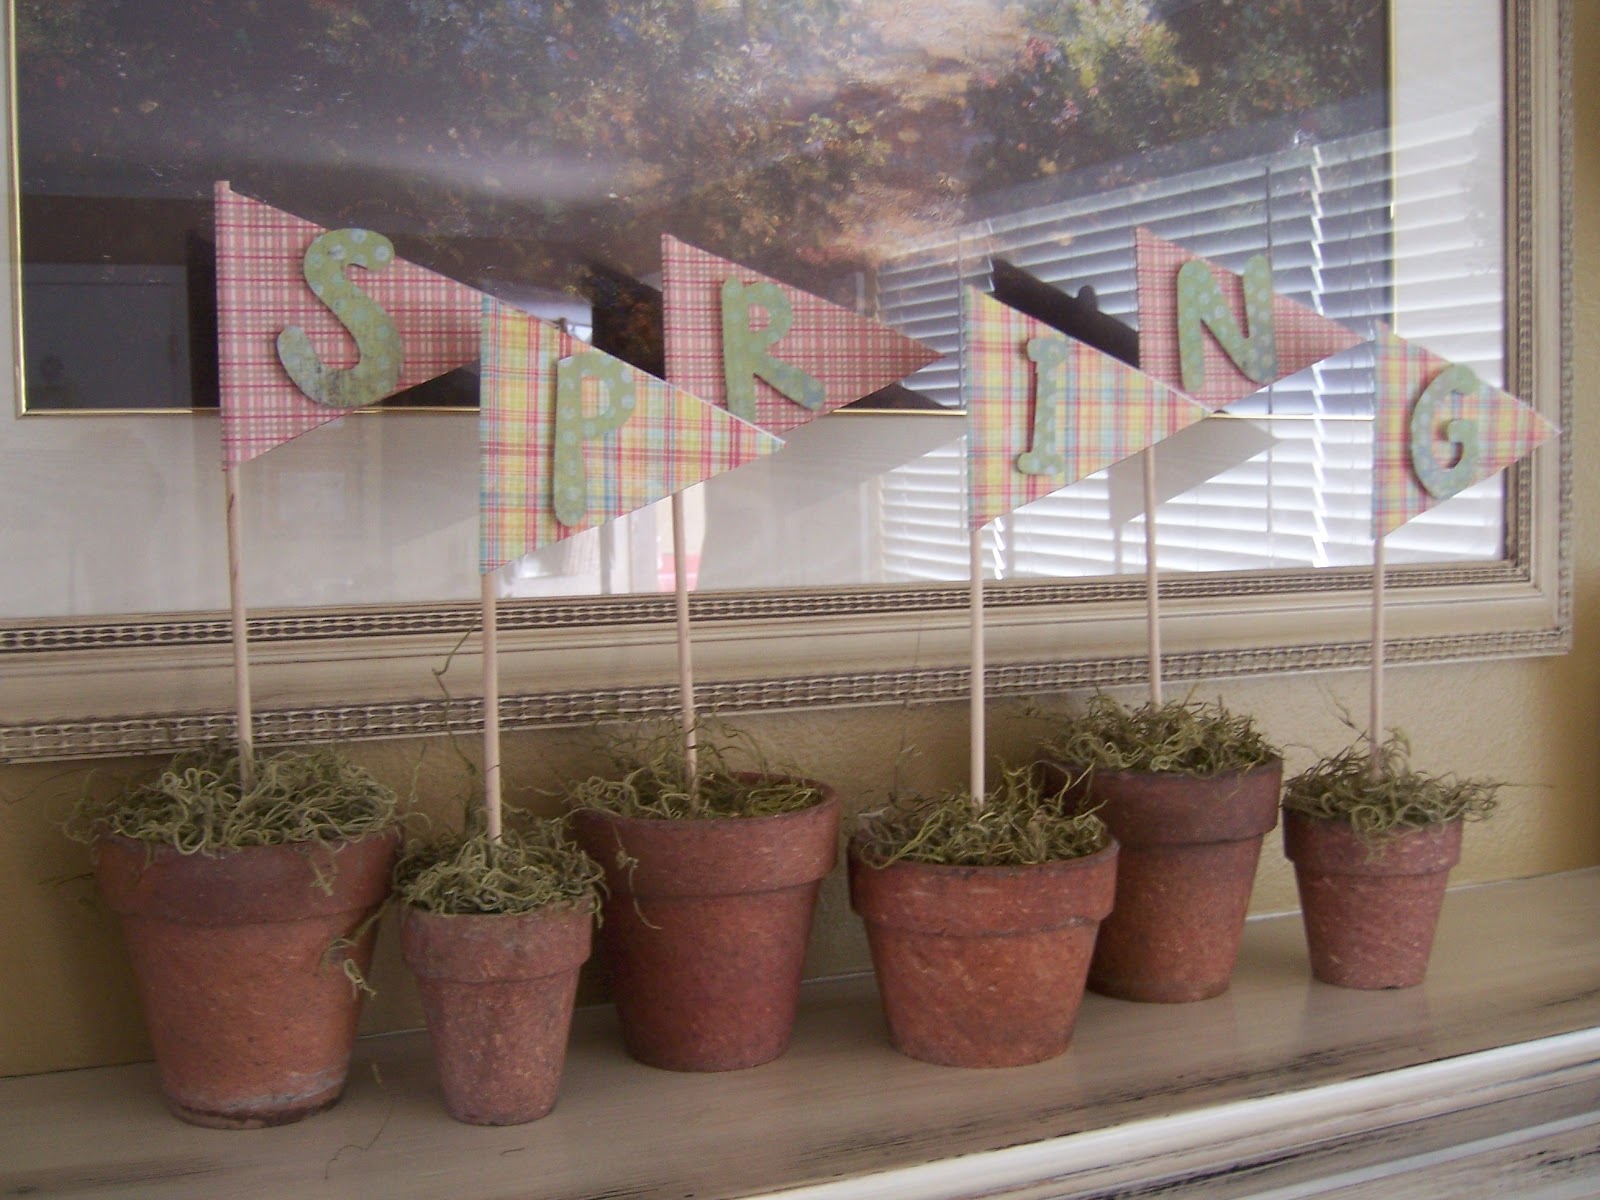
flags & flower pots. . .

If you're looking for a quick & easy way to dress up your mantle,  
spruce up your sideboard, or decorate for a gathering. . .here's a cute idea :)


This project only took me about 30-40 minutes to make. . .

All you'll need is some small random terra cotta pots, scrapbook paper, mini-dowells,
spanish moss, glue stick, and foam. Pretty much everything came from Hobby Lobby, with the exception of the terra cotta pots which were a farmhouse find.


 Step one: cut foam squares, and stuff into pots. . .


Step two: make a diamond shape template on a plain piece of paper, fold in half to
make sure both sides are even, and trace onto the scrapbook paper.

Step three: cover diamonds with a glue stick, and wrap around the dowell
to create a "flag."

Step four: Print & cut out 3" letters from your computer and trace onto scrapbook paper,
cut out, and mount onto flags. Make sure your paper with the letters can be
easily seen against the flag its being mounted to.

Also, I used some foam sticky squares to attatch the letters, to create a 3-D effect. 


Step five: Push dowells into foam, making sure to stagger the heights
to create visual interest. . .


Step six: Fill with moss. . .and you're done :)


Just a thought. . .
Since spring, summer, autumn, and winter each have six letters, it's easy to
just make new flags for each season, and rotate them in the pots :)


Happy Spring :)

If you want to see more tips, tricks, and ideas, click here to view all our other tutorials. :)

Monday, April 9, 2012

Adorable vintage desk & chair for sale!

This sweet vintage desk and chair set has been my personal office for the last few years,
and it breaks my heart to part with it. . .but I've inherited a stunning
farmhouse writing desk that I am soooo excited to put in my new studio :)


Finished in a Robin's Egg blue, with a black undercoating.
This is a one of a kind original vintage desk, solid and sturdy.

 
The chair is finished in a light cream with a soft blue undercoating, and finished in a
walnut glaze overlay. The braided rug seat is NOT included. . .sorry :(


. . .details


This desk measures 42"w x 26"d x 29.5"h.

Desk & chair set is now available for $175


Friday, April 6, 2012

kitchen before & after

Here's a cute little kitchen that was structurally in good shape,
but just needed a little bit of an update. . .


Our client decided to go with an antique white with light walnut glazing.
We also added a tile back splash and bead board on the end
of the cabinets to give it a country feel. . .

 
Laminate counter tops were replaced with a beautiful granite,
and stainless steel under mount sink. . .


The brass hardware was switched out for a more updated bronze, as well as the
white appliances for stainless steel. . .


By refinishing her existing cabinets, the home owner was able to put extra
money into all the other updates to make this kitchen complete.


We LOVE the way this kitchen turned out :)

If you would like a bid on cabinetry, please see our contact page here.


If you would like to purchase a tutorial on oil glazing, click here.